

在最近一次的 WWDC 發佈會,Apple 發表了 iOS 12 的新功能,其中一個就是通知分組功能。
今天,讓我們做一個導覽說明,去了解如何擁有屬於自己的客製通知分組,這非常容易上手,尤其如果你有一個像是聊天 App 或社群軟體 App,但首先要確定:
本篇教學是由 Xcode 10 Beta 第六版完成,所以官方版本釋出後,功能上或許會有一些改變。
通知分組
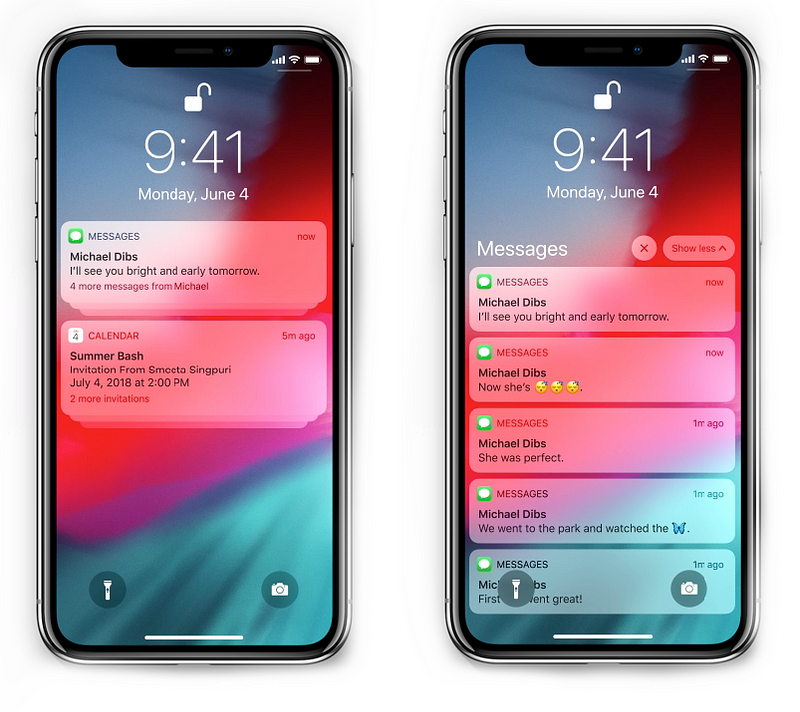
為你的 App 的通知功能分組,可以有效地幫助使用者一眼就得到更多資訊,並即時管理多個通知。
在 iOS 12,對於分組式的通知功能有三種設定方式:
- 自動模式:這是初始設定,可以允許你在每個 App 可以有「聰明」的通知分組,分組可以基於標題、內容、或是其他方法,以 Mail App 為例就是郵件的發送者。
- 以 App 為主:基本來說,所有通知都會以 App 分組,不論標題、內容、或發送者。
- 關閉:這個代表你想要以最原本的方式獨立顯示單一訊息
預設通知
這篇教學我將會使用 UNMutableNotificationContent,這樣一來我可以在模擬器執行本地通知功能。
首先,你需要有使用者同意權限,才可以向他發送通知。你可以在你的範例專案中的 viewDidLoad 方法,加入下列程式碼。
// Ask for Notification Permissions
let center = UNUserNotificationCenter.current()
center.requestAuthorization(options: [.sound, .alert, .badge]) { granted, _ in
    DispatchQueue.main.async {
        if granted {
            UIApplication.shared.registerForRemoteNotifications()
        } else {
            // Handle error or not granted scenario
        }
    }
}
當得到授權通知功能的許可後,我們就加入下列程式碼:
func scheduleGroupedNotifications() {
    for i in 1...5 {
        let notificationContent = UNMutableNotificationContent()
        notificationContent.title = "Hello!"
        notificationContent.body = "Do not forget the pizza!"
        notificationContent.sound = UNNotificationSound.default

        // Deliver the notification in five seconds.
        let trigger = UNTimeIntervalNotificationTrigger(timeInterval: 5, repeats: false)
        // Schedule the notification.
        let request = UNNotificationRequest(identifier: "\(i)FiveSecond", content: notificationContent, trigger: trigger)
        let center = UNUserNotificationCenter.current()
        center.add(request) { (error: Error?) in
            if let theError = error {
                print(theError)
            }
        }
    }
}
上面這個方法是建立一組每 5 秒就會觸發一次的 UNMutableNotificationContent,這樣可以確保我們有足夠時間鎖上螢幕,然後看到通知彈出。我將這段程式碼加入到在範例專案中的 IBAction 中,因為 iOS 12 的版本可以用自動模式來分組,所以通知看起來應該像這樣:

客製通知分組
在某些情況下,使用自動化的分組功能對你的 App 可能不太適合,這樣你就可能需要根據邏輯中的其他指標或變數來建立客製化的分組。
回到我們的示範專案中,假設我需要將所有來自 “your wife” 和 “your son” 的通知分組。要達到這個目的,我們將使用下列函數來更新我們的 notificationContent:
threadIdentifier:與此通知請求相關的線程或對話的唯一識別符。這個識別符將會用於可視化的分組通知中。summaryArgument:為了達成這個通知,我們需要把這個函數插入到 summary。
還要再加入一個資訊:
現在我們的 scheduleGroupedNotifications 方法應該像這樣:
func scheduleGroupedNotifications() {
    for i in 1...6 {
        let notificationContent = UNMutableNotificationContent()
        notificationContent.title = "Hello!"
        notificationContent.body = "Do not forget the pizza!"
        notificationContent.sound = UNNotificationSound.default

        if i % 2 == 0 {
            notificationContent.threadIdentifier = "Guerrix-Wife"
            notificationContent.summaryArgument = "your wife"
        } else {
            notificationContent.threadIdentifier = "Guerrix-Son"
            notificationContent.summaryArgument = "your son"
        }

        // Deliver the notification in five seconds.
        let trigger = UNTimeIntervalNotificationTrigger(timeInterval: 5, repeats: false)
        // Schedule the notification.
        let request = UNNotificationRequest(identifier: "\(i)FiveSecond", content: notificationContent, trigger: trigger)
        let center = UNUserNotificationCenter.current()
        center.add(request) { (error: Error?) in
            if let theError = error {
                print(theError)
            }
        }
    }
}
在模擬器上,通知看起來應該像這樣:
請注意我們如何使用 threadIdentifier 和 summaryArgument 相應地把 “your wife” 和 “your son” 添加到 summary 內,最後製作成兩個通知分組。
現在,你就懂得如何客製化自己的通知分組了!
如果你需要這個示範專案的話,可以從這裡下載。
參考資料
感謝你閱讀此教學,希望你覺得本篇教學對你有幫助。如有任何想法和建議,歡迎留言或在 Twitter 上追蹤我。
LinkedIn: https://www.linkedin.com/in/guerrix/
Instagram: https://www.instagram.com/guerrix/